Video Visit Instructions
Thank you for choosing to have a Video Visit with a NH+C healthcare provider. Below are instructions for how to make the most of your Video Visit using your phone, computer or tablet.
Video Visit Instructions
Thank you for choosing to have a Video Visit with a NH+C healthcare provider. Below are instructions for how to make the most of your Video Visit using your phone, computer or tablet.
Preparing for your Video Visit
Please be sure to read through and follow these steps well before your appointment.
- You must be a current MyHealth portal user. Sign-up if not already.
- Ensure you have a computer with a camera and microphone or a smart phone with a front-facing camera. Tablets can also be used.
- Make sure you have access to a strong internet connection or a strong cellular connection if using a mobile device. Close all other programs on your computer or mobile device.
- If possible, arrange a private place for your visit that limits background noise and interruptions. Make sure you are in a well-lit area, so your face is clearly visible to your provider
- Think about what you want to discuss with your provider. What are your issues and concerns? Do you need any prescriptions renewed or need a new one? Have a list of questions you want to ask.
If You’re Using a Mobile Device
- Make sure your battery is adequately charged [at least 30%] or the device is plugged in and charging.
- Set the device’s default browser settings to allow camera and microphone access [Chrome for Android or Safari for iOS].
If You’re Using a Computer
- Make sure your operating system’s Privacy Settings allow camera and microphone access. Set the device’s default browser settings to allow camera and microphone access [Chrome for Android or Safari for iOS].
- Make sure that your settings do not have “pop-up’s” blocked.
- If using an external webcam, make sure it is properly connected to your computer. Check video connection settings on your computer, make sure webcam is selected.
- Make sure you have a microphone and that it is working. If not, you can use headphones that have a built-in microphone.
- Make sure your battery is adequately charged [at least 30%] or the device is plugged in and charging.
- Consider using earbuds or a headset with a microphone for a better audio experience for you, allow your provider to hear you more clearly, and enable additional privacy. If using a headset, make sure the headset is set as your preferred audio device on your computer.
Starting Your Video Visit
To start your visit by Phone, Tablet, or Computer
- Try to stabilize your mobile device.
- Make sure you are in a well-lit area, so your face is clearly visible to your provider.
- If the patient doesn’t check in within 15 mins of their scheduled video visit appointment time – the appointment will be a “No Show” and need to be rescheduled.
- About 5-10 minutes prior to scheduled appointment log into your MyHealth info portal using a computer, tablet or smart phone.
Image

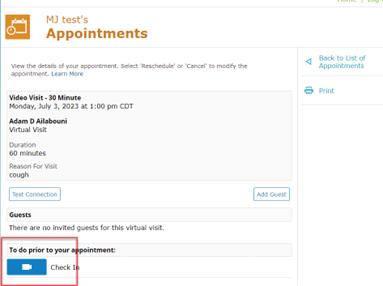
- Click on the appointments tab
- Select the virtual visit
- Click on the camera icon to do the virtual check in
- Step 1: update any information in your patient profile and select next
- Step 2: upload a photo id if one is not already in place and select next
- Step 3: upload you insurance card if one is not already in place and select next
- Step 4: review current medication and add/remove any needed and select next
- Step 5: review current allergies and add/remove any needed and select join visit
- The nurse will join the appointment first to review and update anything needed
- The provider will join the meeting next
- When you are done with the appointment select “leave call”
During and After Your Visit:
- Once you have connected with your provider, discuss your issues and concerns, request prescription renewals, get new prescriptions, etc. Many things can be addressed during a video visit.
- Please note that video visits are just like an office visit, meaning your insurance will be billed afterward and may also require a copay. Check with your insurance plan.
